

Cake slicing is an essential skill for achieving even, visually appealing portions. With the right tools and guides, anyone can master this art, ensuring perfect slices every time.
Importance of Proper Cake Slicing
Proper cake slicing ensures even portions, maintaining the cake’s appearance and flavor. It prevents waste and guarantees everyone enjoys a consistent serving size. For events, precise slicing is crucial for professionalism and guest satisfaction. A well-sliced cake enhances presentation, making it visually appealing. Using the right techniques also minimizes crumbs and mess, preserving the cake’s integrity. Whether for celebrations or everyday servings, mastering cake slicing is key to delivering a polished and enjoyable experience for all. It’s a simple yet impactful skill that elevates any dessert’s presentation and ensures memorable moments.
Overview of the Cake Slicing Guide
This comprehensive guide provides step-by-step instructions for slicing cakes evenly and neatly. It covers essential tools like knives and cutting guides, as well as techniques for various cake shapes and sizes. Whether you’re slicing round, square, or tiered cakes, the guide offers practical tips to ensure professional-looking results. It also includes advice on portion control, presentation, and troubleshooting common issues. Designed for both beginners and experienced bakers, this guide helps you achieve perfect slices every time, making it a must-have resource for any cake-serving occasion.
Tools and Equipment Needed for Cake Slicing
A long, serrated knife and a cutting guide are essential for precise slicing. Serving utensils, like a cake server, and optional tools like a cake stand enhance the process.
Essential Tools: Knives, Cutting Guides, and Serving Utensils
A serrated knife is crucial for clean, even cuts. A cake cutting guide or template ensures uniform slices. Serving utensils like a cake server or spatula help portion neatly. Optional: a damp cloth for wiping the knife between cuts. These tools are indispensable for achieving professional results. Proper equipment ensures precision and presentation, making the slicing process efficient and enjoyable. With the right tools, anyone can master the art of cake slicing.
Optional Equipment: Cake Stands and Turntables
A cake stand or turntable enhances visibility and accessibility while slicing. It allows for even cutting and easy serving. A turntable rotates, enabling slicing from any angle. Stands elevate the cake, making it easier to cut cleanly. These tools are optional but highly beneficial for achieving professional results. They add stability and convenience, especially for tiered or large cakes. Using a stand or turntable ensures a polished presentation and streamlined slicing process, making it a worthwhile investment for frequent cake slicing.
Preparation and Setup for Slicing
Proper preparation ensures smooth cake slicing. Cool the cake completely to firm it up, then stabilize it on a turntable. Use guides for even portions.
How to Cool and Stabilize the Cake Before Cutting
Cooling and stabilizing the cake are crucial steps before slicing. Allow the cake to cool completely on a wire rack to prevent uneven cuts and crumbling. For tiered cakes, ensure each tier is secure and stable. Once cooled, place the cake on a turntable to make slicing easier and more precise. Proper stabilization ensures clean cuts and prevents the cake from shifting during slicing, resulting in even and professional-looking portions every time.
Using a Cake Turntable for Even Slicing
A cake turntable is a valuable tool for achieving even slices. Place the cooled cake on the turntable and rotate it to access all sides easily. This allows for consistent cutting angles and uniform portion sizes. Use a serrated knife and make shallow guide marks first, then slice firmly. The turntable’s rotation helps maintain straight cuts and prevents unevenness. For tiered cakes, secure each tier before slicing to ensure stability and precise cuts. This method ensures professional-looking results and makes serving effortless.
Stabilizing Tiered Cakes for Safe Cutting
Stabilizing tiered cakes is crucial for safe and even slicing. Begin by ensuring each tier is securely attached to its base using dowels or cake pins. Place the cake on a sturdy surface or turntable to prevent wobbling. For multi-tiered cakes, insert a central support rod through all tiers to maintain alignment. Before cutting, allow the cake to cool and set completely. Use a long, serrated knife and slice from the bottom tier upwards, guiding the knife smoothly through each layer. This method ensures stability and prevents the cake from toppling during slicing.

Determining Portion Sizes
Determining portion sizes ensures even distribution and visual appeal. Standard slices are typically 1 inch wide for 2-layer cakes, allowing consistent serving sizes and presentation.
Calculating the Number of Servings
Calculating servings involves measuring the cake’s dimensions and dividing by the desired slice size. For round cakes, use the formula: area divided by slice area. For square or rectangular cakes, divide the total volume by portion size. A standard serving is typically 1 inch wide for a 2-layer cake. Using a cutting guide ensures uniform slices, making it easier to estimate servings. This method helps in planning events and ensuring everyone gets an equal portion, enhancing both presentation and guest satisfaction.
Standard Serving Sizes for Different Cake Types
Standard serving sizes vary based on cake type and layers. Round cakes typically yield 8-12 slices, while square or rectangular cakes offer 9-16 portions. For tiered cakes, servings depend on the size and number of layers. A standard 2-layer cake serves 12-15 people, with slices about 1 inch wide. Naked or semi-naked cakes often have larger portions, around 10-12 slices. Sheet cakes, ideal for large events, can serve 20-40 people, depending on size. Using a guide ensures consistent slices, making it easier to serve evenly and satisfy guests.
Basic Cake Slicing Techniques
Mastering fundamental techniques ensures clean, even slices. Start by stabilizing the cake, then slice horizontally or vertically with smooth, steady knife movements for perfect results.
How to Cut a Round Cake
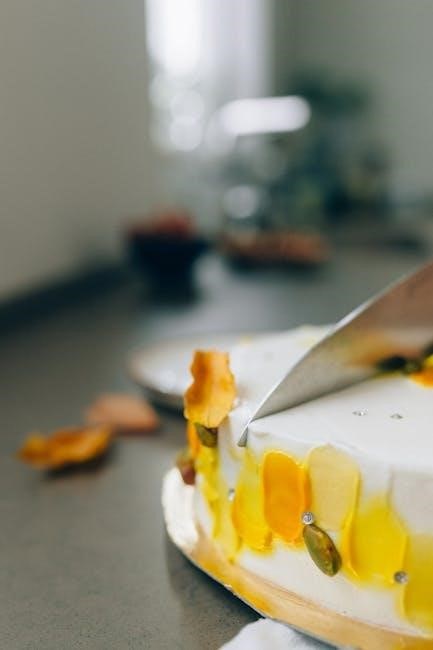
To cut a round cake, place it on a turntable for easy access. Insert a serrated knife at the mid-point, slicing towards the edge with smooth, even strokes. For uniform pieces, divide the cake into equal sections by rotating the turntable after each cut. Wipe the knife clean between slices to prevent crumbs from spreading. This method ensures consistent, clean cuts, making your round cake look professional and appealing to your guests.
How to Cut a Square or Rectangular Cake
To cut a square or rectangular cake evenly, place it on a stable surface like a cutting board. Use a large serrated knife to make precise cuts. Start by dividing the cake into equal sections, either by measuring or using a cutting guide. For uniformity, cut in a grid pattern: make parallel cuts one way, then rotate the cake 90 degrees and cut the other way. Ensure the knife is sharp and clean between cuts to avoid crumbs. Let the cake cool and set before slicing for neat results. Adjust the number of cuts based on desired serving sizes for consistent, clean slices.

Advanced Slicing Techniques for Special Cakes
Master advanced techniques for tiered, naked, and sheet cakes. Use serrated knives for clean cuts, and employ horizontal slicing for even layers. Ensure stability and precision always.
Slicing Tiered Cakes
Slicing tiered cakes requires precision and care to maintain their structural integrity. Start by placing the cake on a sturdy stand or turntable. Use a serrated knife to make horizontal cuts between tiers, ensuring even layers. Score the cake lightly before cutting to guide the knife. For stability, slice one tier at a time, working from the bottom up. Use a cake cutting guide or template to achieve uniform portions. Always wipe the knife clean between cuts to prevent crumbs from transferring. This method ensures clean, even slices and preserves the cake’s decorative appeal.
Slicing Naked or Semi-Naked Cakes
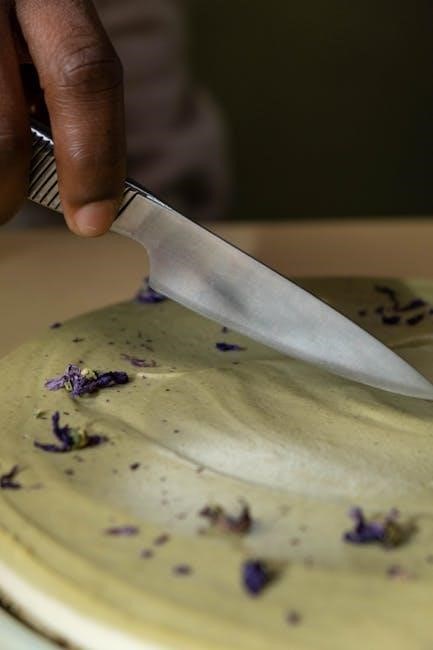
Naked or semi-naked cakes, with minimal frosting, require careful slicing to maintain their aesthetic appeal. Use a sharp, serrated knife to glide smoothly through the layers. Lightly score the cake where you plan to cut to ensure straight lines. Slice in a gentle sawing motion, applying even pressure. To prevent tearing, chill the cake slightly to firm the layers. Wipe the knife clean between cuts to avoid transferring crumbs. Place slices on a serving plate or platter, arranging them neatly for a polished presentation. This technique preserves the cake’s delicate appearance while achieving clean portions.
Slicing Sheet Cakes
Sheet cakes are ideal for large gatherings due to their size and ease of slicing. Start by placing the cake on a sturdy surface and using a cutting guide or template for even portions. Cut the cake into a grid pattern, first making horizontal cuts and then vertical ones, to create uniform slices. A serrated knife works best for clean cuts through the layers. For standard portions, aim for slices about 1 inch wide for a 2-layer cake. Wipe the knife between cuts to prevent crumbs and frosting from transferring. This method ensures neat, consistent slices for effortless serving.

Tips for Achieving Even and Neat Slices
Use a cutting guide or template for uniform portions. Maintain straight, steady cuts with a sharp knife. Wipe the blade between slices to prevent crumbs and residue buildup.
Using a Cutting Guide or Template
A cutting guide or template is a valuable tool for ensuring even and consistent slices; Place the guide on top of the cake, aligning it with the edges, and use it as a visual marker for portioning. This method is especially helpful for tiered or large cakes, where uniformity is key. Gently press the knife along the guide’s edges, using a smooth, sawing motion. For tiered cakes, start from the bottom tier and work upward. This technique guarantees precise, professional-looking results every time, making it ideal for special occasions or events.
Knife Techniques for Clean Cuts
For clean cuts, use a sharp, serrated knife and apply gentle, even pressure. Start by cutting the cake in half vertically, then slice horizontally for smaller portions. Wipe the knife with a damp cloth between cuts to prevent crumbs from transferring. For tiered cakes, slice from the bottom tier upward. Saw gently in a smooth motion, avoiding applying too much pressure, which can tear the cake. This ensures crisp, even edges and professional-looking slices. Regularly cleaning the knife prevents residue buildup and keeps cuts precise. These techniques work well for round, square, or tiered cakes, ensuring consistent results.
Properly cleaning the knife between cuts ensures precise slices and prevents crumbs from transferring. Use a damp cloth to gently wipe both sides of the blade after each cut. For buttercream or frosted cakes, a clean, slightly damp cloth removes excess frosting without damaging the knife; Avoid rinsing the knife under running water to prevent rust or damage. For tougher residues, a soft sponge or paper towel can be used. Regular cleaning maintains the knife’s sharpness and ensures clean, even cuts. This simple step enhances the overall presentation and quality of each slice. Consistency is key for professional results. Presentation enhances the appeal of sliced cake. Arrange slices neatly on a platter or individual plates, garnishing with fresh fruits or dusting with powdered sugar for an elegant finish. Arrange cake slices symmetrically on a platter or plate for a visually appealing presentation. Place slices evenly, leaving space between them to avoid overcrowding. For tiered cakes, start from the largest slice at the bottom and graduate to smaller ones. Consider creating a pattern, such as alternating slice sizes or angles, to add visual interest. Use a cake turntable to ensure even distribution and stability. Fresh flowers, berries, or powdered sugar can be added as garnishes for an elegant finish. This method ensures each slice is accessible and the presentation remains neat and attractive. For individual plates, position each slice in the center, slightly angled for visual appeal. Add a dollop of whipped cream or a sprinkle of toppings to enhance the look. Ensure the plate is clean and free of crumbs for a professional finish. This step transforms the cake from a dessert to a stunning culinary display, perfect for special occasions or casual gatherings; Garnishing individual cake slices enhances their appeal and personalizes the presentation. Fresh flowers, berries, or edible herbs like mint or rosemary are popular choices for adding color and fragrance. Lightly dusting with powdered sugar creates a elegant, clean look. For a festive touch, drizzle chocolate sauce, caramel, or fruit coulis over the slice. Sprinkles, chopped nuts, or shredded coconut can add texture and vibrancy. Consider matching the garnish to the cake’s flavor, such as citrus zest for lemon cakes or cocoa powder for chocolate. These simple additions elevate each slice from ordinary to extraordinary, making it a memorable treat. Optional decorations like small candles or themed cake flags can also be added for special occasions. Arrange garnishes thoughtfully to balance the slice’s appearance without overwhelming it. This step transforms each portion into a visually stunning and delicious delight, perfect for impressing guests or celebrating milestones. Uneven slices? Realignment and a steady hand can fix this. Crumbly texture? Ensure the cake is fully cooled and use a serrated knife for clean cuts. To prevent crumbling, ensure the cake is completely cooled and stabilized before slicing. Use a serrated knife with gentle, even pressure. For tiered cakes, insert dowels for support. A turntable can help maintain balance while cutting. Wipe the knife between cuts to remove crumbs, reducing the risk of tearing. If the cake is particularly delicate, refrigerate it for 10–15 minutes to firm up before slicing. These steps ensure clean, intact slices and a professional finish. If slices become uneven or crooked, realign the knife with the cutting guide or template for consistency. Adjust your slicing technique by ensuring even pressure and straight cuts. For corrections, gently trim edges with a small knife. To maintain uniformity, rotate the cake on a turntable and use a serrated knife for smooth cuts. Regularly wiping the knife between slices prevents crumbs from affecting accuracy. For significant unevenness, start over by stabilizing the cake and re-cutting evenly. Practice and patience are key to achieving perfectly aligned slices every time. Mastering cake slicing ensures perfectly portioned servings and enhances presentation. With the right tools, techniques, and practice, anyone can achieve professional results, making every slice a delight. For perfect cake slicing, always use a sharp knife and wipe it clean between cuts to prevent crumbs from spreading. Cool the cake completely to ensure stability and even cuts. Use a turntable for better access and apply gentle, even pressure. For tiered cakes, slice one tier at a time. Optional guides or templates can help achieve uniform portions. Practice makes perfect—experiment with different techniques to find what works best for you. With patience and the right tools, you’ll master the art of cake slicing in no time. Experimenting with different slicing techniques can elevate your cake presentation and portioning. Don’t be afraid to try new methods—practice enhances your skills. Start with simple round cakes and gradually move to tiered or naked cakes. Each attempt brings you closer to perfection. Share your creations with friends and family to gather feedback and refine your technique. Remember, every cut is a learning opportunity. Embrace the process, and soon you’ll confidently slice any cake with ease and precision, impressing everyone with your culinary artistry.How to Wipe and Clean the Knife Between Cuts

Presenting and Serving the Sliced Cake
Arranging Slices on a Platter or Plate
Garnishing and Decorating Individual Slices
Troubleshooting Common Issues
Preventing the Cake from Crumbling
Fixing Uneven or Crooked Slices
Final Tips for Perfect Cake Slicing
Encouragement to Practice and Experiment